0
Items
USD $0.00

Using Mermaid Markers to make Flowers
By Victory Nichols
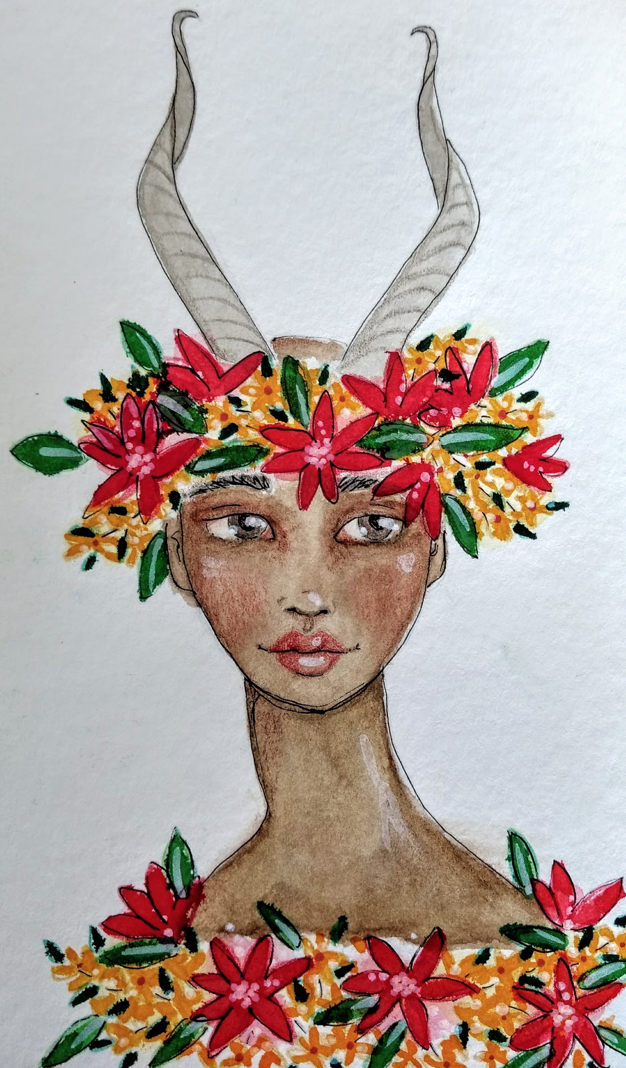
One of my favorite supplies in the JDMM line is the Mermaid Marker. I loooove my Mermies! When I found myself wanting to add a flower crown to my Gerenuk Girl, I knew that Mermies were the way to go. Because of their brush tips, Mermaid Markers make flowers and leaves super easy.
(Note: in this tutorial, I’m going to skip over any details involving how I drew or colored the girl herself, and focus just on how to make the flowers. )
Step 1
Draw a girl (or boy!)’s face or use one of Jane’s face stamps. Add horns–they don’t have to be perfect. Perfect is overrated! Mark where you want your flowers. I literally made circular scribbles to mark mine. You don’t want perfection here, either. Most things in nature are asymmetrical and imperfect, so intentional asymmetry makes your drawing look more natural.
Once you like the general shape of your flower crown, go ahead and erase the scribbles inside the general shape, leaving the edge scribbles intact.
I laid down a base color on her skin and horns before going to step 2.
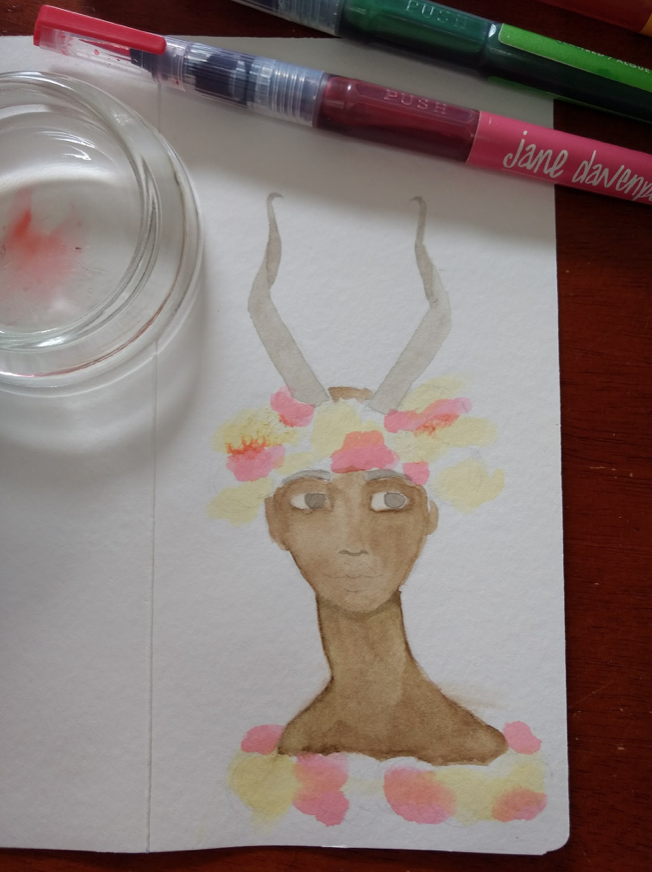
Step 2
Mix one drop of Mermaid Marker ink with one drop of water, and use a waterbrush to lay down a light wash of your flower colors. Again, wonky is your friend! This will give you a layout for your flowers, and put a layer of color behind them, so you don’t have blank page peeking out.
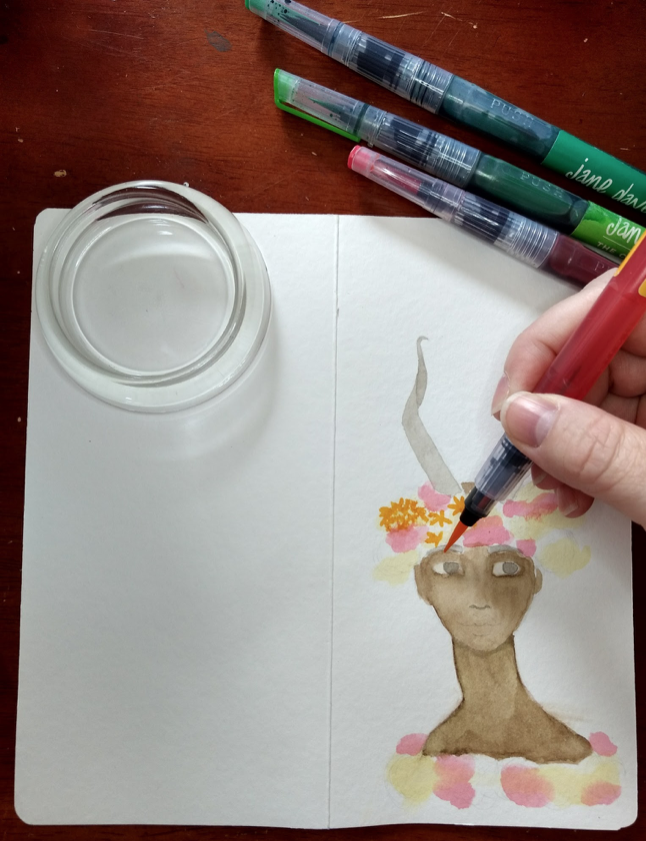
Step 3
Now we’re going to make flowers! You don’t have to worry about making brush strokes or anything like that. You are simply going to lay the SIDE of your brush tip against the paper, and it will automatically make a petal/leaf shape. When you want a smaller petal, you simply touch less of the tip to the paper. Go ahead and practice on some scratch paper if you like. As you can see, I rotated my paper constantly to lay my brush tip at different angles.
When you’re doing flower crowns, you do want to follow an order of sorts:
Flowers before leaves
Big before little (I broke this rule, because I just got too excited about the little yellow flowers)
Following this order helps you to fill the space evenly. Also be sure to add partial flowers so that it looks like you have flowers from different angles. Some of my yellow flowers are just a jumble of petals, and that’s fine. Remember, imperfection makes it look Not Fake. (Have I said that enough times? Once more–imperfection is your friend!)
<– Laying the brush on its side, not up & down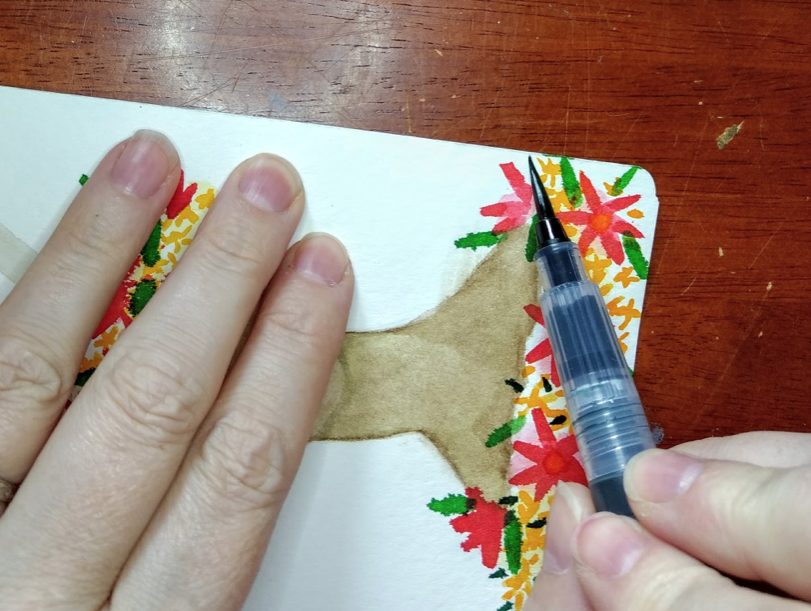
Step 4
Add details however you like. Here’s what I did:
Went around each flower & leaf quickly, loosely, and imperfectly with Magic Wands, just to flesh them out and give dimension.
Added dots to the centers of some flowers, as well as randomly throughout the crown using chalk markers (like Jane’s Paint Over Pens). I also added a single stripe in each of the big leaves.
Went around the edge of the big flowers and leaves with my epic pen, and added little strokes between some of the yellow flowers to look like branches/stems.
That’s it! I can’t wait to see what you make! Tag me on Instagram @victorynichols or on Facebook @Victory Johnson Nichols, and I will totally check it out!
Supplies used:
Mechanical pencil with 2H lead
JDMM Petit Palette Neutral watercolors
JDMM Mermaid Markers
JDMM Magic Wands
Chalk Markers
Platinum Carbon Ink fountain pen
By Victory Nichols
Would you like to be featured in a Guest Post with a technique or tip Idea using Jane Davenport art supplies? We would love to feature you!
We can’t guarantee publication, but try our best! (What is helpful is for you to have a look through past posts to make sure your post idea hasn’t been covered before).
xoxo Jane


Welcome to my blog Davenpeeps!
If we haven’t met yet, I’m Jane Davenport! I’m a professional artist, art workshop teacher, 5x bestselling author, art supply creator and self-diagnosed art supply addict!
I’m a creativity expert who has guided tens of thousands of women back to their art, defying their self imposed creative gravity and making art with joy and confidence. I share my mixed media art and drawing techniques with everyday artists who feel their creativity calling them to play with colour, texture and their art supplies. I hope my blog can help you embrace the mess, let go of perfectionitis and experience the joy of creativity.
LEARN MORE ABOUT ME >

