0
Items
USD $0.00
Where to Start? Look at our Kits! :Click here

Hello Davenpeeps! My name is Martice Smith and I’m a proud Davenparty member. Today, I’m sharing a fun jewelry project that is all the rage, right now!

Supplies to gather:
Step One: Print out the cute designs!
I’ve already drawn a handful of them for you. Choose your favorites! Or, you can draw your own. The choice is yours…
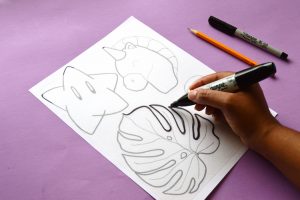
Step Two: Draw your designs
Place one sheet of the Shrinky Dinks® plastic on top of your drawing page. There are two different surfaces on the film: one side has been pre-sanded, so it feels rough when you touch it. Make sure the rough side is facing up. (This is the side your drawing and painting will go on.)
The back side of the Shrinky Dinks®plastic is smooth.
You can tape plastic down so it doesn’t move around while you draw.
Trace the lines of your drawing with a black marker. A chisel tip marker will give you variation of line character (thin and thick). A fine tip marker is best for smaller details.
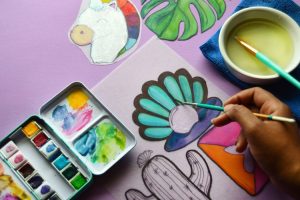
Step Three: Paint your designs
I took a peek at the instructions for making the Shrinky Dinks® and it says that colored pencils, acrylic paints and paint markers can be used.
The instructions go on to say that watercolor markers shouldn’t be used.
Well, guess what? I’m a very curious artist and known for pushing my creative edge.
I had to see for myself why watercolors wouldn’t work so I experimented on a small piece of plastic.
Results: the watercolors did not lay smoothly – it pooled in some areas and skipped and hiccuped as I brushed it across the plastic. No bueno! It was not a pretty sight.
Enter Jane’s Gess-Oh! I mixed a tiny bit of gesso with the watercolors then started to paint. Yesss! Smooth consistency all the way through.
(The gesso created a bond with the watercolor which allowed the two to spread evenly on top of the Shrinky Dinks® plastic – it looked very similar to gouache paint.)
*If you’re a kid, please ask an adult to help you with the remaining steps.*
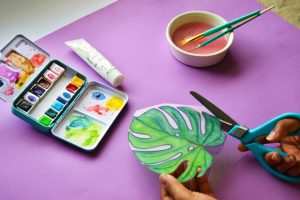
Step Four: Let’s cut them out!
Using a sharp pair of scissors, cut out each design, as smoothly as possible. If there are sharp, pointy corners in any of your designs, cut them so that they are slightly round. (An Exacto blade is perfect for those smaller shapes bulky scissors struggle to reach.)

Step Five: Time to bake
Following the instructions on the Shrinky Dinks® plastic, I pre-heated the oven to 325° F (163°C).
Next, I placed four of the designs, colored side up, in a baking pan lined with tin foil.
I placed them into the oven for 3 minutes and watched the magic happen! Right before my eyes, the plastic started to curl up…and shrink!! Once the plastic shrinks, it will flatten out all by itself.
Step Six: Let cool, seal with varnish
After your pieces have cooled, remove them from the baking pan.
Optional, to get the look of enamel: Place them on another sheet of paper and spray on a glossy varnish. (You could also brush on Mod Podge. However, when it dries, your brushstrokes will be visible.)
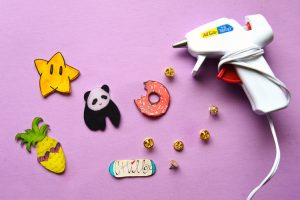
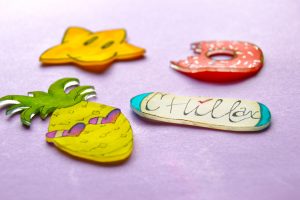
Step Seven: Attach pins
Use a glue gun to attach jewelry pins to your new faux-namel pins. Look at how awesome they are! Make more, share with friends and collect your favorites!
The project was super fun to create for you! If you loved this project and decide to try it out, be sure to tag your projects with these hashtags when you post your images so that we can all be inspired by what you’ve created!
#janedavenportmixedmedia #davenpeeps #jdmm

SHARE
[Sassy_Social_Share]

Welcome to my blog Davenpeeps!
If we haven’t met yet, I’m Jane Davenport! I’m a professional artist, art workshop teacher, 5x bestselling author, art supply creator and self-diagnosed art supply addict!
I’m a creativity expert who has guided tens of thousands of women back to their art, defying their self imposed creative gravity and making art with joy and confidence. I share my mixed media art and drawing techniques with everyday artists who feel their creativity calling them to play with colour, texture and their art supplies. I hope my blog can help you embrace the mess, let go of perfectionitis and experience the joy of creativity.
LEARN MORE ABOUT ME >

Art supply addict?

Wow, you sure have landed in the right place!
Join my newsletter to receive all the art supply launches, announcements, creativity tips & challenges.