0
Items
USD $0.00
Need an art spark? The Mermayzing Creative Zine is available for instant download :Click here!

Hello, wildly creative DavenPeeps!
It’s Martice, back with a unique spin on creating simple, statement jewelry using the incredibly gorgeous paper pad from Jane’s collection!
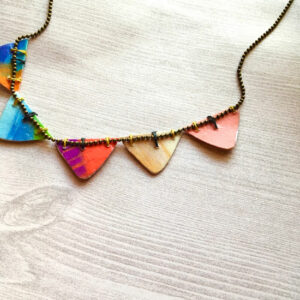
I love this necklace because it makes people stop and ask, “How did you make that?“, and it doesn’t look like paper at all. With the addition of Matte Medi-YUM!, the paper pieces looks like flat, shiny stones you’d find along a river bank.
I hope you enjoy today’s project! Let’s get started…
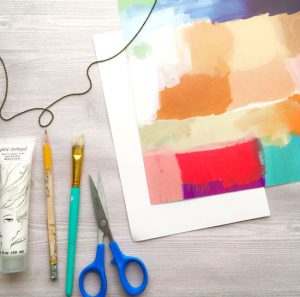
Here’s what you’ll need:
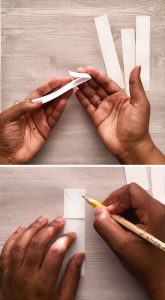
Step ONE: Create a template
Cut out one strip of cardstock, approximately one inch wide. Doesn’t matter how long the strip is because we’re gonna cut it down in size later.
Using a pencil, draw a triangle onto the cardstock. The folded edge will be the base of the triangle.
TIP: Draw a rounded tip on the triangle.
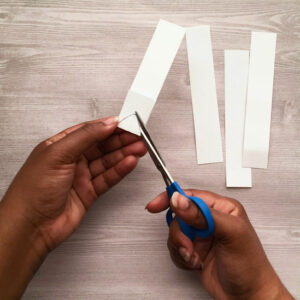
Next, cut out your template, making sure you keep the tip rounded.
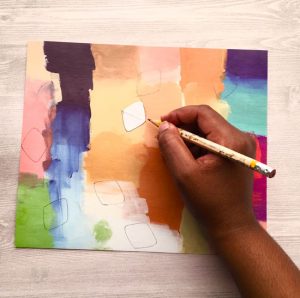
Step TWO: Use a pencil to trace around your template.
Move the template around for your favorite “sweet spots” on the paper. What are “sweet spots”? Sweet spots, as I like to call them, are the really cool parts of the paper that you absolutely love.
TIP: Place the template so that it overlaps two different colors. This will help your necklace look more interesting because of the variety in colors.
If you see parts that make you get all googly-eyed and then you say something like “OOOoo! I like this!”, that’s a sweet spot. Use that for your necklace!

Step THREE: Cut out the shapes
Decide how many buntings you want on your necklace.
My necklace will have a total of five buntings. I also cut out a couple more, just because they look so pretty. My heart does double-back-flips when I’m playing with color combos! So much fun.
Step FOUR: Fold the shapes in half + glue together
Next, we’re gonna fold each one of our paper shapes in half, making sure all edges are even.
(Optional: Use a bone folder to get your folds nice and flat.)
Brush on some Matte Medi-YUM on the inside of each bunting. Let them dry for a few minutes.
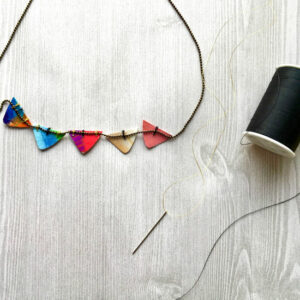
While your buntings are drying, go ahead and thread your sewing needles – one with black thread and the second one with gold thread.
Step FIVE:
Find the center of your necklace.
Take one of your buntings and slide it under the center of the necklace.
(This part is a bit tricky. If you’re a kid, ask for help, if needed.)
Find the center of the paper.
While holding the necklace and paper in place, sew them together with a needle and black thread. Doesn’t have to be exact – just eyeball it.
Loop the thread around the folded edge a few times. (I looped it three times for extra support.)
Make a knot with your thread on the back side of the bunting.
Trim off excess thread.
Step SIX:
Next, take your metallic thread and sew close to each end of the bunting. Loop the thread around the folded edge a few times.
Make a knot with your thread on the back side of the bunting.
Trim off excess thread.
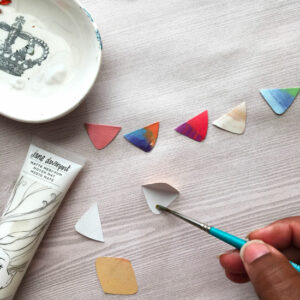
Step SEVEN: Seal with Matte Medi-YUM!
Brush on a few coats of Matte Medi-YUM on the front and back of each bunting.
This makes your paper bunting necklace stronger, helps it last longer and makes it waterproof.
I love that this paper is archival and acid free. Bonus points! This means that I don’t have to worry about the paper fading or turning yellow over time.
Happy creating, Davenpeeps!

SHARE
[Sassy_Social_Share]

Welcome to my blog Davenpeeps!
If we haven’t met yet, I’m Jane Davenport! I’m a professional artist, art workshop teacher, 5x bestselling author, art supply creator and self-diagnosed art supply addict!
I’m a creativity expert who has guided tens of thousands of women back to their art, defying their self imposed creative gravity and making art with joy and confidence. I share my mixed media art and drawing techniques with everyday artists who feel their creativity calling them to play with colour, texture and their art supplies. I hope my blog can help you embrace the mess, let go of perfectionitis and experience the joy of creativity.
LEARN MORE ABOUT ME >

Art supply addict?

Wow, you sure have landed in the right place!
Join my newsletter to receive all the art supply launches, announcements, creativity tips & challenges.